A smartphone in 2026 is more than a communication device — it's your authenticator, your wallet, your health record, and the key to nearly every digital account you own. A compromised phone isn't a minor inconvenience; it can mean a drained bank account, a stolen identity, and months of recovery.
The good news: securing a modern smartphone to a very high standard takes less than 30 minutes, and most of the best protections are already built in — they just need to be turned on. Start by identifying your exact phone model with WhatPhone, since settings paths differ between iOS, Samsung One UI, and stock Android.
Step 1: Lock Screen — Your First Line of Defence
The lock screen is the first barrier between a thief or opportunist and everything on your device. An unlocked phone is a total security failure regardless of every other setting below.
- Use a 6-digit PIN minimum. A 4-digit PIN has only 10,000 combinations — crackable in minutes with the right tools. A 6-digit PIN raises this to 1 million, and an alphanumeric passcode is exponentially stronger.
- Enable biometric unlock (Face ID or fingerprint) for convenience, but always set a strong PIN as fallback — biometrics can fail and are legally more vulnerable in some jurisdictions than a passcode.
- Enable auto-lock at 30 seconds or 1 minute. A phone left unlocked on a cafe table is a security incident.
- Disable sensitive notifications on lock screen. On iPhone: Settings → Notifications → Show Previews → When Unlocked. This prevents someone glancing at your lock screen from seeing 2FA codes, message content, or bank alerts.
- iPhone users: Enable Stolen Device Protection (Settings → Face ID & Passcode → Stolen Device Protection). This requires biometrics for sensitive actions even when the passcode is known — closing a loophole thieves have used to change Apple ID credentials after watching victims enter PINs in public.
Step 2: Enable Two-Factor Authentication (and Move Away from SMS)
Two-factor authentication (2FA) means even if your password is stolen in a data breach, an attacker still can't access your account without your phone. It should be enabled on every important account: email, banking, social media, and cloud storage.
However, SMS-based 2FA has a critical weakness: SIM swapping. Criminals can call your carrier, impersonate you, and transfer your number to their SIM — intercepting all your SMS 2FA codes in minutes. The solution:
- Use an authenticator app instead of SMS for 2FA. Google Authenticator, Authy, and Apple's built-in iCloud Keychain OTP generator all work without network access and can't be SIM-swapped.
- For maximum security, use a hardware security key (YubiKey) for your most important accounts — Google, Apple ID, financial institutions.
- Add a SIM PIN. On iPhone: Settings → Cellular → SIM PIN. On Android: Settings → Security → SIM Card Lock. This prevents someone who steals your SIM from using it in another phone without the PIN.
- Enable a carrier account PIN or passphrase with your mobile operator directly — this prevents SIM swap attempts via phone support.
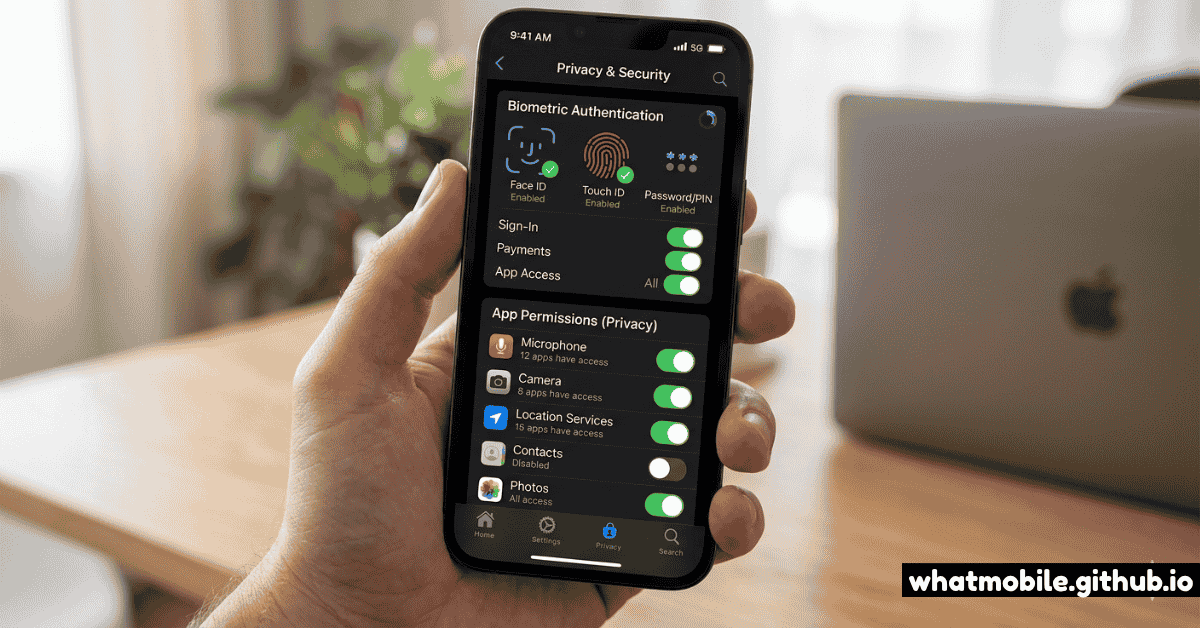
Step 3: Audit App Permissions
Apps request permissions when installed — but many accumulate permissions they don't genuinely need. A flashlight app with microphone access, or a game with continuous location tracking, is a privacy risk worth eliminating.
How to audit permissions on each platform:
- iPhone: Settings → Privacy & Security. Each permission category (Location, Microphone, Camera, Contacts, etc.) lists every app with that access. Review each and switch unnecessary access to "Never" or "Ask Next Time".
- Android: Settings → Privacy → Permission Manager. Same concept — tap each category to see which apps have access. Toggle off anything suspicious.
- Pay particular attention to: Location (set to "While Using" not "Always" for apps like maps), Microphone (only messaging and camera apps need this), and Contacts (only give to apps that genuinely need to read your contacts).
- On Android 12+, the Privacy Dashboard shows a timeline of which apps accessed sensitive permissions in the past 24 hours. This is revealing — review it once to see what's actually happening in the background.
Step 4: Adopt Passkeys — The Future of Authentication
Passkeys are the most significant shift in authentication security in a decade. They replace passwords entirely with a cryptographic key pair: a private key stored on your device (secured by your biometrics) and a public key on the server. The result is inherently phishing-resistant authentication — there's no password for a phishing site to steal.
Where and how to use passkeys in 2026:
- iPhone (iOS 16+): Passkeys are saved in iCloud Keychain and sync across your Apple devices. When a supported website or app offers passkeys, choose "Create a Passkey" at sign-in — Face ID or Touch ID handles authentication from then on.
- Android (Android 14+): Passkeys are stored in Google Password Manager (or a third-party manager like 1Password). They work in Chrome and in supporting apps.
- Major services with passkey support in 2026: Google, Apple, Microsoft, GitHub, PayPal, eBay, Adobe, WhatsApp, X (Twitter), Shopify, and hundreds more.
- If passkeys aren't available for a service, use a strong unique password in a password manager (1Password, Bitwarden, Apple Keychain, Google Password Manager) rather than reusing passwords.
Step 5: Network Security — VPNs and Public Wi-Fi
Your phone connects to dozens of networks — home Wi-Fi, office networks, public hotspots, and cellular data. Not all of these deserve the same trust level.
- Your home and mobile data (4G/5G) connections are already encrypted at the network layer. A VPN on these doesn't meaningfully improve security.
- Public Wi-Fi (airports, hotels, cafes) is where a VPN adds genuine value — it encrypts your traffic before it leaves your device, making eavesdropping on the local network useless. Read our connectivity guide for more on network security in the field.
- If you use public Wi-Fi regularly, a reputable paid VPN (Mullvad, ProtonVPN, ExpressVPN) is worth the cost. Free VPNs often monetise your traffic data — defeating the purpose.
- Disable Wi-Fi when not in use or enable "Ask to Join Networks" — this prevents your phone from automatically connecting to networks with the same name as ones you've used before (an "evil twin" attack).
- Check that your home router uses WPA3 encryption — WPA2 is still the minimum acceptable, but WPA3 fixes key vulnerabilities in handshake security.
Step 6: Prepare for Theft Before It Happens
If your phone is stolen, the first 60 minutes matter enormously. Being prepared turns a potential identity theft nightmare into a recoverable inconvenience.
- Note your IMEI number now. Dial
*#06#on any phone — it appears immediately. Write it somewhere accessible without your phone. Your carrier needs this to blacklist a stolen device from mobile networks. - Enable Find My on iPhone: Settings → [Your Name] → Find My → Find My iPhone. Enable "Send Last Location" — this transmits the last known location when the battery dies.
- Enable Find My Device on Android: Settings → Security → Find My Device. Ensure it's connected to your Google account.
- Set up Theft Protection on Android 10+: Settings → Safety & Emergency → Theft Protection. This detects if the phone is grabbed and run with and can trigger automatic lock.
- Know your iCloud or Google account credentials from memory. If your phone is stolen, you'll need to log in from another device quickly to lock or wipe it.
- Enable automatic backup (iCloud Backup on iPhone, Google One Backup on Android) so your data can be restored to a replacement device. Back up your foldable or primary device at least weekly.