Article Content
Smartphone cameras have undergone a radical transformation. What once required a professional DSLR and years of darkroom experience can now be achieved in seconds on the device in your pocket. The catalyst? Artificial intelligence baked directly into the camera pipeline.
In 2026, every major phone manufacturer — Apple, Samsung, Google, OnePlus, and Xiaomi — ships devices with dedicated AI silicon that processes photographs in real time. The results are extraordinary. But most users only scratch the surface of what's possible.
This guide walks you through every major AI camera feature, when to use each one, and the settings that most users miss. Before diving in, use WhatPhone to identify your exact device — knowing your phone model tells you which specific AI camera platform you're running.
Step 1: Know Your AI Camera Platform
Different phone brands use different AI processing engines. Understanding yours helps you find the right settings and know what's possible.
| Brand | AI Camera System | Generative AI | Night Mode |
|---|---|---|---|
| Apple (iPhone 15+) | Photonic Engine + A17 Pro ISP | ✓ Clean Up | ✓ Computational |
| Samsung (S24+) | Snapdragon 8 Gen 3 NPU | ✓ Generative Edit | ✓ Expert RAW |
| Google (Pixel 9) | Tensor G4 ISP + TPU | ✓ Magic Editor | ✓ Night Sight |
| OnePlus (13) | Hasselblad AI Tuning | ~ Limited | ✓ Nightscape |
| Xiaomi (15 Ultra) | Leica AI Processing | ✓ AI Erase | ✓ Night Mode |
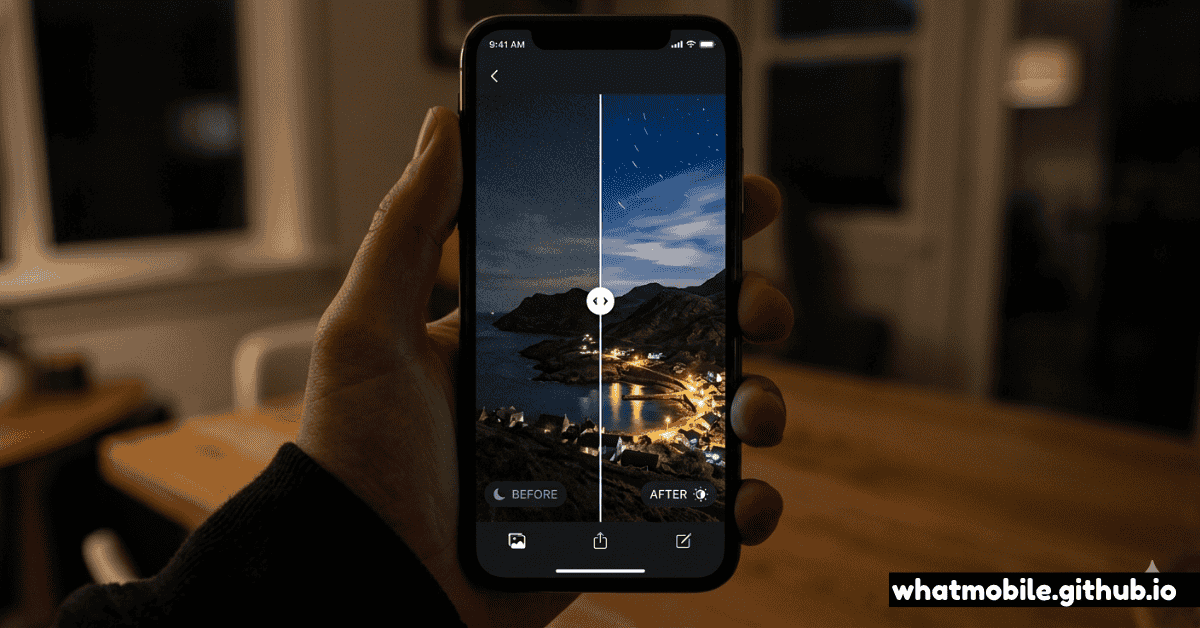
Step 2: Enable Computational Night Mode
Night mode is where AI photography earns its keep. The difference between a grainy, blurry dark shot and a clean, vibrant image comes down to whether you're using computational photography correctly.
Set Night Mode to "Auto"
Open your Camera app → Tap the Night/Moon icon → Select Auto. This lets your phone's AI decide when to engage night processing based on ambient light levels — far more accurate than manual triggers.
Brace or prop the phone
Even though AI merges multiple frames to reduce shake, a stable phone produces dramatically better results. Lean against a wall, place the phone on a surface, or use a small tripod. Even 2 seconds of stability makes a visible difference.
Adjust exposure manually when needed
Tap to focus, then swipe the brightness slider down before shooting. Slightly underexposed AI-processed shots preserve highlight detail far better than letting the AI overexpose and clip the sky or streetlights.
On Google Pixel: Enable "Astrophotography" mode
When stationary (on a tripod), Pixel's Night Sight automatically enters Astrophotography mode for scenes with stars. The phone captures up to 4 minutes of frames and merges them — resulting in shots that reveal the Milky Way with a phone camera.
Step 3: Master AI Scene Detection
Modern phones recognize dozens of scenes in real time — food, sunsets, pets, documents, architecture, text — and automatically adjust colour, contrast, sharpening, and HDR processing for each category.
Enable "AI Scene Optimization" or "Scene Detection"
Settings → Camera → AI Features → Turn on Scene Optimization. On Samsung, this is called Shot Suggestions. On iPhone it's always-on as part of the Photonic Engine.
Watch the scene indicator
Most Android phones show a small icon in the viewfinder when a scene is detected. A flower icon means macro; a mountain means landscape. Watch these and ensure the phone is detecting correctly before shooting.
Shoot food on a flat surface
Shooting straight down (overhead / flatlay) triggers food-scene detection on most phones. This boosts saturation slightly and optimizes depth-of-field rendering — making dishes look more appetising without any editing.
Step 4: Use Generative AI Editing
Post-capture AI has become as important as capture-time AI. The latest features go well beyond filters — they can remove objects, extend backgrounds, and move subjects.
Google: Magic Editor & Magic Eraser
Open Google Photos → Select a photo → Tap Edit → Magic Editor. Circle any subject to reposition it. The AI fills in the background realistically using generative diffusion models. Magic Eraser removes unwanted objects (tourists, bins, powerlines) with a single tap.
Samsung: Generative Edit
In Samsung Gallery → Edit → tap Generative Edit. You can move, resize, or rotate any object in the frame. The AI generates plausible background fill for the space left behind. Galaxy AI watermarks generated content automatically.
Apple: Clean Up (iOS 18+)
In Photos app → Edit → tap the Clean Up brush. Swipe over any distracting element — a cable, a stranger, litter. The tool is exceptionally clean on iPhone 15 Pro and 16 models with A17/A18 chips due to on-device processing.
Step 5: Shoot in Pro RAW or Expert RAW
AI processing on JPEGs is impressive — but for maximum control, shoot in RAW. Modern phone RAW formats aren't the same as old linear RAW. They bake AI processing into a "computational RAW" that gives you the flexibility of RAW with the look of AI-processed output.
Enable Apple ProRAW (iPhone 12 Pro+)
Settings → Camera → Formats → Apple ProRAW. Tap the RAW toggle in the Camera app viewfinder. ProRAW files capture Deep Fusion, Smart HDR, and Night Mode processing in a lossless DNG — editable in Lightroom or Apple Photos with full 12-bit latitude.
Use Samsung Expert RAW (S22+)
Download Expert RAW from Galaxy Store. It shoots multi-frame HDR RAW with full control over ISO, shutter speed, and histogram display. Files are editable in Lightroom and Adobe Camera Raw with exceptional shadow recovery.
Edit in Lightroom Mobile for best results
Import your ProRAW or Expert RAW file into Lightroom Mobile. Use the AI-powered Enhance → Denoise feature to clean up high-ISO shots — then use Tone Curve and Colour Grading for a professional finish without cloud processing.
Step 6: Advanced Tips for Power Users
Use Semantic Zoom for AI-Enhanced Telephoto
On Pixel 9 Pro and iPhone 15 Pro Max, the phone uses AI to synthesize detail between actual optical zoom levels. At 3.5× on the iPhone (between 3× optical and 5× optical), the phone is generating detail with AI. Knowing this helps you choose the right zoom step — optical anchors (1×, 3×, 5×) always produce the cleanest results for printing or cropping.
Leverage Real-Time Bokeh Refinement
Portrait mode in 2026 doesn't just blur backgrounds — it detects individual strands of hair, transparent glasses, and pet fur in real time and applies precise segmentation. For best results: ensure good contrast between subject and background, shoot at 1–1.5m distance, and use the Portrait Depth slider after shooting rather than before.
Check your phone's AI features first
Many users don't know which features their phone actually supports. Use WhatPhone's free detector to confirm your exact model, then look up the feature list for your specific device rather than assuming features from the brand's marketing.